My Next Steps in Contributing to the Open-Source Society


Photo by Markus Spiske on Unsplash

After successfully getting started with contributing to the Open-Source society. I am planning to work on four new Open-Source projects in the future.

Check out my previous blog post to know more about my first contribution to the Open-Source society.

MICROSOFT – VS CODE

VS Code is a type of tool that combines the simplicity of a code editor with what developers need for their core edit-build-debug cycle. It provides comprehensive editing and debugging support, an extensibility model, and lightweight integration with existing tools.

  VS Code is built using Javascript, Typescript, and CSS on top of Electron framework.

I have been using the VS Code for two years and I love this code editor. I usually develop web apps using the VS Code. Currently, the VS Code has around 4500 issues on GitHub. I want to help the VS Code by fixing some of its issues. Also, I will become more familiar with Javascript and TypeScript.

Website

GitHub

BRAVE – BRAVE BROWSER

Brave is a free and open-source web browser available on Windows, MacOS, Linux, Android, and IOS. Brave is designed with a built-in adblocker to provide an ad-free and seamless browsing experience.

The Brave windows browser is built using JavaScript and Brave android app uses Java.

I have been using Brave for six months but never thought of contributing to it. Now, I am planning to resolve potential issues to both the Brave Windows browser and the Brave Android App. I will be able to improve my front end skills with JavaScript. I will also gain a deeper understanding of different functionalities of the web browser.

Website

Google Play Store

GitHub – Web

GitHub – Android

DUCK DUCK GO – ANDROID

Duck Duck Go is an Internet search engine available on Web, Android, and IOS platforms. The astonishing thing about this search engine is to protect the user’s privacy. It avoids the filter bubble of personalized search results and shows all users the same search results for a given search term.

The Duck Duck Go Android app is built using Kotlin.

It has been a month since I started developing on Android apps using Java but never worked with Kotlin. It will be a great opportunity for me to learn about Kotlin. I am planning to resolve the backend related issues of the project. I will also learn about how a search engine works.

Website

Google Play Store

GitHub

TEAMMATES

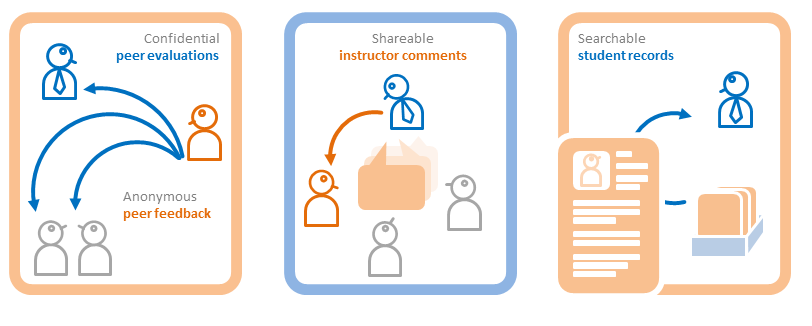
TEAMMATES is a free online tool for managing peer evaluations and other feedback paths of your students. It is provided as a cloud-based service for educators/students and is currently used by hundreds of universities across the world.

The Teammates website uses both Java and TypeScript.

I am really good at Java programming and want to contribute my skills and time to resolve issues on the project. Moreover, I will be able to develop my programming skills with TypeScript. I will be able to further develop my knowledge/understanding of the Java production-ready applications.

Website

Github

Let me know if you want to recommend any Open-Source projects related to JavaScript, Android and Machine Learning.

Advertisement

Git Commands that can come in handy

You may be using Git for a long time or new to it. But, today I am going to introduce you to Git Log and Git Remote commands which might come very useful in your day to day interaction with the Git and can make your life pretty simple.

But first, you need to know the difference between Git and Github.

Git is Version Control System.

GitHub is a web-based service for version control using Git.

In easy words…

Git helps us to keep track of our files and any changes made to those files on our local machine.

Github is a website that contains source code in different repositories managed through Git

Alright now, let’s get started with Git Log

Git Log

Shows the commit logs.

Functions

  • It allows us to keep track of our works.
  • This command helps give context and history for a repository.
  • It let users customize the formatting of each commit output of the log.
  • It also lets users filter commits in the log output.

Let us explore some options that can be helpful with Git Log command:

Draws a text-based graphical representation of the commit history on the left-hand side of the output.

git log --graph

Here is an example of the log output with –graph keyword.

(The output is a big list, not just five commits) As shown in the above image, the “git log –graph” retrieved the commit history on the branch (issue-667) of the filer project.
(The list continues) As shown in the above image, the “–graph” shows you previous merge represented by a different color for each branch.

Link to view my pull request. Also, check out my previous post to know more.

The standard “git log” command isn’t very terminal friendly as it displays lots of text. So, if you want to view commit history with only commit message then, oneline can be very convenient.

As shown in the above image, with “–online” shows the commit history with just commit message.

To filter commits by their commit message


As shown in the above image, with “–grep” shows only those commits which include “fs.readdir.spec.js” in their commit message.

Click on this link to know other options of Git Log.

Git Remote

This Git command is used to manage your Central servers for hosting your git repositories.

Function

  • It lets you create, view, and delete connections to other repositories.
  • This command is also responsible for syncing change.
  • The git remote command is essentially an interface for managing a list of remote entries that are stored in the repository’s ./.git/config file.
Using git remote to connect other repositories

For example, the above diagram shows two remote connections from your repo into the central repo and another developer’s repo. Instead of referencing them by their full URLs, you can pass the origin and john shortcuts to other Git commands. (Source)
git remote

This command shows the list of all remote connections you have to other repositories.

To add a connection to John’s repo

git remote add john http://dev.example.com/john.git

To remove John’s connection

git remote rm john

It has only one option i.e.

git remote -v

This command shows the list of all remote connections you have to other repositories with the URL of each remote connection.

Sample output(Source)

git remote -v
origin  git@bitbucket.com:origin_user/reponame.git (fetch)
origin  git@bitbucket.com:origin_user/reponame.git (push)
upstream  https://bitbucket.com/upstream_user/reponame.git (fetch)
upstream  https://bitbucket.com/upstream_user/reponame.git (push)
other_users_repo  https://bitbucket.com/other_users_repo/reponame  (fetch)
other_users_repo  https://bitbucket.com/other_users_repo/reponame  (push)

Official Documentation links

Git Log

Git Remote

Some Cool Videos

Check out this video to learn some cool tricks with git-log

This is the best video if you want to become master of Git remote

My First Open Source Contribution Experience


Photo by Finn Hackshaw on Unsplash

This week I got an opportunity to work on Filer web filesystem project. Check out this link to know more about the project.

Throughout the whole time, I got hands-on experience on both Github and Git.

At first, I was confused between Git and Github.

Later, I found out…

Git is Version Control System.

GitHub is a web-based service for version control using Git.

In easy words…

Git helps us to keep track of our files and any changes made to those files on our local machine.

Github is a website that contains source code in different repositories managed through Git.

You can install Git through this link. Also, you need a GitHub account in order to make a contribution to any Open Source Project on GitHub.

How can I contribute to Open Source Society?

Well, there are so many ways……

Now, I am going to show you how I contributed to the Filer project on the GitHub

1) Firstly, I navigated to the Filer project on the GitHub.

2) Then, I forked the project by clicking on the button as shown in the image below

By forking, GitHub created a repository under my GitHub account.

3) After forking, I cloned the filer project on my local machine.

To clone the project click on the green button “Clone or download” and copy the link. You can either use a “Clone with SSH” or “Clone with HTTPS”.

Tip - Use "clone with ssh" to save your time in the future. With  ssh, you don't have to input your GitHub credentials and other details later when creating a pull request. But beforehand, you need to set-up an ssh key. Refer to this link to set up an ssh key. 

4) I opened my code editor (Visual Studio Code) and created a repository on my local machine by using git clone command shown below

git clone git@github.com:jatinkumarg/filer.git

5) After the cloning, I used “npm test” to make sure everything installed properly.

6) Now, it was time to either find a good bug or issue a bug.

You can find lots of bugs under the “Issues” tab.

I decided to file an issue.

So, I browsed around the code for some time and then I found files in which some of the variables use “var” as a data type which quite outdated. According to ES6 declaration style, “let” and “const” should be used to declare any variable in JS. Refer to this link to know more about ES6 declaration style.

7) Since it was my first time reporting a bug on GitHub so I just chose one file i.e. fs.readdir.spec.js filing for the issue.


Link of my issue page.

Soon I was assigned to fix the issue.

Now, It was time to code

8) I opened the earlier cloned project on Visual Studio Code and opened the fs.readdir.spec and changed the “var” declared variables with either “const” and “let” as shown below

9) After the required changes, I again executed “npm test” to check the code.

10) I used “git add” to stage the changes

git add fs.readdir.spec.js

Then,

git commit -m "Fixed #667: Replaced var with either const or let and added strict mode in fs.readdir.spec.js"

And later,

git push origin issue 667

It generated a link through which I was able to create a pull request for the filer project.

Link of my pull request.

Almost done,

After pull request, GitHub generated a CodeCov Report using Travis CI.

Luckily, I passed all the checks with 86.71% coverage.

You can review my changes through the “Files changes” tab. (link)

Red lines represent lines before changes and green lines represent after changes.

In the end, I reviewed other developer’s pull request.

Review 1

Review 2

Review 3

Conclusion

While reviewing (Review 1) pull request I found one of the contributors recommended to use ‘use strict’ at the top of the file. Then I found ‘use strict’ prevent certain actions from being taken and catches any thrown exceptions. (link) So, I added the ‘use strict’ at the top of the “fs.readdir.spec.js”. And, recommended other developers to add ‘use strict’ at the top of their file(Review 3).

Also through (Review 2), I found ‘const’ is more preferred over ‘let’ when variables aren’t changing their values. So, I changed variables declared with ‘let’ to use ‘const’ in “fs.readdir.spec.js”.

There were a few times when I was lost during the process of creating a pull request on GitHub but anyhow I figured it out through quick Google searches.

Tip - Listen to music while doing reasearch on Google (Really helps!)

In the future, I will ask my fellow developers for assistance to save some time.

Overall, I really enjoyed the whole process and I am looking forward to contributing more to the Open Source Society in the future.

NodeJS: Check whether a file exists or not with fs

Photo by Markus Spiske on Unsplash
Warning: Don't use fs.exists(path, callback) as it is deprecated.
Reason: The fs.exists method uses a callback that is inconsistent with other Node.js callbacks.

What should we use then?

The fs.existsSync(path) method can be used as it does not use any callback.

It takes one argument i.e. path as a string and returns true if the file exists and vice versa.

An example is shown below:

var fs = require('fs');

// fs.existsSync(path) returns boolean
if (fs.existsSync(path)) {
    console.log('File exists!');
} else{
    console.log('Sorry, File does not exists!');
}

Usually, it’s not recommended to use fs.existsSync as it can break your asynchronous code due to unnecessary blocking.

So, what’s the next option?

Well, according to the latest Node.js v11.7.0 Documentation, fs.stat(path[, options], callback) and fs.access(path[, mode], callback) are suggested as alternatives.

Lets, look more deep into it!

1) fs.access(path[, mode], callback)

It takes three arguments as follows:

  • path – string for a file path
  • mode- an optional argument, specifies the accessibility checks to be performed
  • callback – invokes if an error occurs
const file = 'package.json';

// Check if the file exists in the current directory.
fs.access(file, fs.constants.F_OK, (err) => {
  console.log(`${file} ${err ? 'does not exist' : 'exists'}`);
});

// Check if the file is readable.
fs.access(file, fs.constants.R_OK, (err) => {
  console.log(`${file} ${err ? 'is not readable' : 'is readable'}`);
});

// Check if the file is writable.
fs.access(file, fs.constants.W_OK, (err) => {
  console.log(`${file} ${err ? 'is not writable' : 'is writable'}`);
});

// Check if the file exists in the current directory, and if it is writable.
fs.access(file, fs.constants.F_OK | fs.constants.W_OK, (err) => {
  if (err) {
    console.error(
      `${file} ${err.code === 'ENOENT' ? 'does not exist' : 'is read-only'}`);
  } else {
    console.log(`${file} exists, and it is writable`);
  }
});

According to NodeJS documentation, if a user wants to check file existence without manipulating it afterward, fs.access() is recommended. As it checks the existence of a file without opening it.

2) fs.stat(path[, options], callback)

It takes three arguments as follows:

  • path – string for a file path
  • options – an optional argument, an object which holds the value of bigint.
  • callback – returns error or Stats object depending if an error occurred or not.
var fs = require('fs');

fs.stat('path', function(err) {
    if (!err) {
        console.log('File exists!');
    }
    else if (err.code === 'ENOENT') {
        console.log('Sorry, file does not exist!');
    }else {
        console.log(err.code);
    }
});

Returns an object Stats with lots of elements as given below:

Stats {
 dev: 3803513792,
 mode: 33206,
 nlink: 1,
 uid: 0,
 gid: 0,
 rdev: 0,
 blksize: undefined,
 ino: 281474976744241,
 size: 227700,
 blocks: undefined,
 atimeMs: 1518123325605.2195,
 mtimeMs: 1456549122349.375,
 ctimeMs: 1456549122349.375,
 birthtimeMs: 1518123325605.2195,
 atime: 2018-02-08T20:55:25.605Z,
 mtime: 2016-02-27T04:58:42.349Z,
 ctime: 2016-02-27T04:58:42.349Z,
 birthtime: 2018-02-08T20:55:25.605Z }

How to check if a file exists before reading or writing on a file?

If a user wants to check for the existence of a file before reading or writing, then a user should do it directly and handle the error manually as shown below:

Check before writing on a file

s.open('myfile', 'wx', (err, fd) => {
  if (err) {
    if (err.code === 'EEXIST') {
      console.error('myfile already exists');
      return;
    }

    throw err;
  }

  writeMyData(fd);
});

Check before reading a file

fs.open('myfile', 'r', (err, fd) => {
  if (err) {
    if (err.code === 'ENOENT') {
      console.error('myfile does not exist');
      return;
    }

    throw err;
  }

  readMyData(fd);
});

Refer to official NodeJS documentation for more information.